A Brief Presentation of Several Compositional Armatures Rule of Thirds PHI Grid Golden Triangle Dynamic Symmetry Expanded Dynamic Symmetry Harmonic Armature Fibonacci Spiral Vanishing Point Grid Informal Subdivision Golden Mean "Caliper" System Orthogons Divisions into Fifths (Kimberly Elam) Introduction As a Mathematician, I have become intrigued with several Armatures used by current and historic artists. In this post I have applied the armatures to several historic paintings. I wanted to analyze the armatures further. Which ones seem most helpful? I have tried to choose examples by artists that consciously utilized the given armatures. I may use one example for now, but have to select the most appropriate for this analysis. Many historic paintings have used a complex design scheme consisting of more than one armature, but I will begin with a simple armature. But for example some classical works were based on combinations of Root 2, Root 5 and Golden Spiral armatures. We ...
Dynamic Symmetry Appendix By Karen Halbert Sept 10, 2025: The more mathematical sections that include theorems and cartesian coordinate systems have been moved to a standalone Dynamic Symmetry Mathematics Appendix. https://karenhalbert.blogspot.com/2025/09/dynamic-symmetry-mathematics-appendix.html This appendix has some basic Dynamic Symmetry Constructions. It will be updated periodically to include additional advanced topics that might not be covered in a regular workshop to be used by workshop attendees interested in covering more topics in depth. . Dynamic Symmetry Armature Construction Tools Ruler, Pencil . Any straight edge may be used; a ruler is not required though some might want to measure distances between points. T-square : to construct lines perpendicular to a diagonal at right angles (90 degrees). I use a small plastic T-square in t...
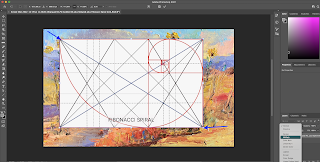
Introduction It's helpful to have your grids in a folder on your computer that is easily accessible. Construction 1.Select an existing painting to be overlaid with a grid and drag it to Photoshop (or open it with Photoshop). 2. Find the desired "PNG" grid for the overlay on your painting. (See other posts for instructions on the creation of this particular hand-made grid), 3. Drag it over your painting image in Photoshop. Sometimes the painting image itself has a color profile that doesn't allow an overlay. In this case do a Screen shot of the painting jpeg image (see below for instructions) to convert it to a png without the color profile and start over. 4. Stretch the overlay to fit the painting by grabbing the corners and dragging to the image corners. But be careful not to change the proportions (don't hold the shift key for this procedure). 5. Convert it to transparent by changing the setting in the layer from "normal" to 'multiply'. If th...