Dynamic Symmetry Appendix

Dynamic Symmetry Appendix
By Karen Halbert
Sept 10, 2025: The more mathematical sections that include theorems and cartesian coordinate systems have been moved to a standalone Dynamic Symmetry Mathematics Appendix. https://karenhalbert.blogspot.com/2025/09/dynamic-symmetry-mathematics-appendix.html
This appendix has some basic Dynamic Symmetry Constructions.
It will be updated periodically to include additional advanced topics that might not be covered in a regular workshop to be used by workshop attendees interested in covering more topics in depth.

Dynamic Symmetry Armature
Construction Tools
Ruler, Pencil. Any straight edge may be used; a ruler is not required though some might want to measure distances between points.
T-square: to construct lines perpendicular to a diagonal at right angles (90 degrees). I use a small plastic T-square in the field for my 9x12s. But one can easily use a second panel to mark off the right angle on the diagonal, lining it up from a corner of the first panel to a main diagonal at right angles. A T-square can help make sure that vertical and horizontal lines are drawn also (or the second panel)
Compass or protractor: This may be a helpful tool, though an attempt will be made to indicate where a measurement can be made with a ruler rather than a compass.
Dynamic Symmetry Armature Construction
This section includes the step-by-step construction of a Dynamic Symmetry Armature on a panel or draft paper, for any proportion. The Dynamic Symmetry Armatures for panels with different proportions are noticeably different, since to begin with, the main diagonals cross each other at different angles if the proportions are different. Also, the reciprocal endpoints are at different locations on the edges for different proportions.
Main Diagonals plus one ‘reciprocal’.

Draw diagonal lines from corner to corner. Drop a perpendicular line (known as a reciprocal) from the lower right corner through a main diagonal at 90 degrees (or right angles) ending on the top edge.
Main Diagonals with all four Reciprocals.

Drop the remaining three lines perpendicular to the main diagonals from the corners. Note that the end result has two lines extending from each corner (one a main diagonal and one a reciprocal – to the other diagonal).
(Final) Basic Dynamic Symmetry Armature
This is the basic Dynamic Symmetry Armature. It has the main diagonals and their reciprocals plus 4 main verticals and horizontals through the intersections of the diagonals and their reciprocals. Let's call these intersection points the "poles" of the armature. They might be good choices as focal points.

This seems to be a sturdy scaffolding. The eyes are at points of maximum thrust since the angle between the two intersecting lines is maximized at 90 degrees. The eyes also have several lines radiating from them, potential directional lines to draw the viewers' eye around the canvas.
But is there anything else about the structure that is not only strong but pleasing? I propose that the fact that the 'grid' has additional rectangles with the same proportion as the whole to be important - the rectangles in the corners - and the middle. Their diagonals line up with the main diagonals. They are self-similar, with the same shape or proportion as the main rectangle.
5
Self-similar Rectangles
An expanded Dynamic Symmetry Armature can also yield additional self-similar rectangles. If we drop verticals from the top edge at the points where the reciprocals meet the top edge it can be shown that the vertical rectangles constructed here are the same proportion as the main rectangle (in reverse). The fact that the reciprocal line is perpendicular to the main diagonal is the reason for the same proportion. (see Self-Similar Rectangle Theorem in the https://karenhalbert.blogspot.com/2025/09/dynamic-symmetry-mathematics-appendix.html appendix).

The turquoise lines delineate the vertical rectangles with the same proportions (with the dotted lines the diagonals of these rectangles). To visualize how these rectangles are self-similar, with the same proportions, rotate a vertical one 90 degrees so that its diagonal lines up with the main diagonal of the larger rectangle/panel.
This division into self-similar rectangles of the same proportion is at the heart of Dynamic Symmetry, illustrating the magical ‘self-similarity’ so prized by the Classical Greeks and by Renaissance artists.
Self-similar Rectangle Alternative Method
If you have two identical rectangles (panels) of the same proportion you may use the second to
mark off the smaller, vertical self-similar rectangle in the first rectangle, using its main
diagonals.
Two duplicate rectangles – one horizontal and one vertical each with a baroque diagonal. Place
the horizontal on top of the vertical so that their lower right corners coincide. The intersection of
the vertical’s baroque diagonal with the top edge of the first rectangle (orange arrow) is the top
left corner of a smaller vertical rectangle fitting inside the original one. Note that its main
diagonal can be extended to the larger diagonal of the vertical larger rectangle. Hence the rectangles are
similar. This smaller vertical rectangle sometimes uses the term, self-similar, or Reciprocal Rectangle.


Note that we have inadvertently constructed a right rebated square as well, 2 birds with one stone so to speak (see next). The width of the larger vertical rectangle is the same length as the height of the original rectangle.
Rebatement of the Squares
One more aspect of a fully expanded Dynamic Symmetry Armature is rebatement of the squares (also known as rabatment). It is based on the theory that a square is a fundamental unit and as such it is appealing to viewers; a painting with perceived squares or derivations of squares is calming and natural. Classical artists began to use rabatment of the squares to design their paintings. Its use continues to this day.


Construct the dotted square with its dotted diagonals as on the left, with the sides
all the same size as the larger rectangle's shortest side. This is called rebatement of
the square; the shorter side is rotated about the longer side. Do the same on the
right side.
Color the rebated squares pink:

Expanded Dynamic Symmetry Armature
Now combine the self-similar rectangles and rebated squares: The pink lines denote the rebated squares and their diagonals while the turquoise lines denote the self-similar, reciprocal rectangles and their diagonals.

Dynamic Symmetry plus Rebated Squares plus some verticals and horizontals
-
Black main diagonal lines from corner to corner.
-
Turquoise diagonal lines* (known as reciprocals) from the corners perpendicular (90
degree) to the main diagonals extending to the top and bottom edges (form the diagonals
of the self-similar, smaller vertical rectangles; see the Self-Similar Rectangle Theorem.
-
Vertical and Horizontal gray lines through the intersections of the main diagonals with the
reciprocals.
-
Turquoise vertical lines from the top and bottom edges where the reciprocals meet the
edges.
Note that 1) – 3) describe the Basic Dynamic Symmetry Armature. Adding the lines in 4) result in the self-similar rectangles.
The eyes -or potential focal points- (indicated in the BW diagram below) are at points of maximum thrust since the angle between the two intersecting lines is maximized at 90 degrees. The “eyes” also have several lines radiating from them, potential directional lines to draw the viewers' eye around the canvas. Other junction points may be used as focal points, to encourage the viewer to move around the painting, resting at junctions and staying in the painting.

The Expanded Dynamic Symmetry Armature allows the artist to take advantage of several fundamental elements of dynamic symmetry: rebated squares emphasize how the composition has a fundamental unit (square) as a basis; self-similar rectangles build on the importance of repeating shapes at different magnifications – something comfortable to our eyes.
Summary Basic Dynamic Symmetry Panel Measurements


Formulas for other panels:
The formula for the Top Intercept: Baroque Diagonal Reciprocal is:
width – (height * height)/width
The formula for the Top Intercept: Sinister Diagonal Reciprocal is:
(height*height)/width
Check that these two intercepts add up to the width. Also note, for example that for the 6x8 panel the proportion of the implied vertical rectangle is 4.5 x 6 the same as 6 x 8. Note that the intercepts switch positions on the top edge for the last three (wider) panel sizes; ie, the Baroque Reciprocal is moved to the right of the Sinister Reciprocal intercept
Comparison of Dynamic Symmetry (basic) Armature with Rule of Thirds

4 to 3 Basic Dynamic Symmetry Compared with the Rule of Thirds

Root 4 Basic Dynamic Symmetry compared with Rule of Thirds
Golden and Whirling Squares Spiral
Illustrations
Much of this information is taken from Wikipedia.

Construction of the Whirling Square
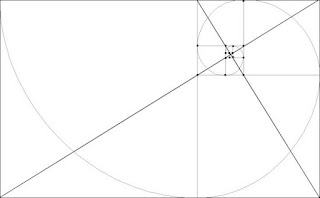
The light grey squares are marked off within this rectangle. Construct the spiral itself by drawing a quarter circle in each square as indicated, with the radius = side of the square. They form what are called the whirling squares. Note that in a golden rectangle with aspect ratio 1.618... a smaller golden rectangle is formed with the part left over after constructing the square. And this continues as we 'whirl' around.
Fibonacci Series
https://en.wikipedia.org/wiki/Fibonacci_sequence
In mathematics, the Fibonacci sequence is a sequence in which each number is the sum of the two preceding ones. Numbers that are part of the Fibonacci sequence are known as Fibonacci numbers, commonly denoted Fn . The sequence commonly starts from 0 and 1, although some
authors start the sequence from 1 and 1 or sometimes (as did Fibonacci) from 1 and 2. Starting from 0 and 1, the first few values in the sequence are:
|
0, 1, 1, 2, 3, 5, 8, 13, 21, 34, 55, 89, 144,... |

Whirling Squares (with 'eye' at lower right)
I like to use Fibonacci numbers as measurements for my canvas; eg, 5x8", 8x13" and multiples of the 5x8: 10x16" and 15x24" (near-PHI paintings, where PHI is the golden mean - 1.618...). I prefer these proportioned canvases.
Golden Rectangle and Golden Spiral
There are many excellent resources on the Golden Rectangle. Its pervasive presence in nature might demonstrate why it along with the golden spiral have fascinated artists for millennia. It fascinates me as an artist but also as a Mathematician. There are critics that say that it is overblown, but no one criticizes the beauty of the equations surrounding the golden spiral.
Construction of the Golden Rectangle

1x1 Square


Construct the partial circle with radius the length of this line to the bottom edge (extension) with a compass (or a taut string with pencil).

Complete the rectangle formed by the square edge of height 1 and the lower edge to the end of the arc as indicated.
Using the Pythagorean Theorem one can show that the radius squared or hypotenuse squared = (1/2) squared plus 1 squared or (5/4) squared. And this hypotenuse is the same length as the dashed line onthe bottom edge.
The height of this final rectangle is 1 with the bottom edge 1/2 plus (the dashed line) = 1/2 plus the square root of (5/4). So the bottom edge is what we call the golden mean or 1/2 plus 1/2 * square root of 5.
This is the Golden Rectangle.
Alternative Golden Rectangle View(s)

A distinctive feature of this shape is that when a square section is added—or removed—the product is another golden rectangle, having the same aspect ratio as the first. Square addition or removal can be repeated infinitely, in which case corresponding corners of the squares form an infinite sequence of points on the golden spiral, the unique logarithmic spiral with this property. Diagonal lines drawn between the first two orders of embedded golden rectangles will define the intersection point of the diagonals of all the embedded golden rectangles; Clifford A. Pickover referred to this point as "the Eye of God".[2]
Let’s superimpose the spiral on our golden rectangle dynamic symmetry armature; this is the armature I use for golden rectangle proportioned panels.

The common notation for the Golden Mean is PHI.
The blue spiral is called a whirling squares' spiral, formed by quarter circles within the squares constructed within this golden rectangle. This spiral approximates the mathematical definition of the Golden Spiral, which is a logarithmic spiral with growth factor PHI.
Note that for all practical purposes we can draw a golden spiral with using the whirling squares.
Construction of Golden Rectangle Inside a Square

-
Draw a line from the lower left corner to the midpoint of the right side. From the Pythagorean Theorem the length will be the square root of (1 + one half squared ) or 1 + 1⁄4 = square root of 5/4 or 1⁄2 square root 5, denoted \/5/2.
-
With a compass draw an arc from the lower right corner with radius 1⁄2 up to the line from 1). Mark a point on the line.
-
Draw another arc from the lower left corner up to the left edge with radius as indicated \/5/2 – 1⁄2, the part left over after subtracting 1⁄2 from the line to the right edge’s midpoint.
-
This number is the reciprocal of the golden mean:
a. Golden mean=1⁄2+\/5/2
b. 1/golden mean=1/(1/2+\/5/2)=(1/2-\/5/2)/(1/2+\/5/2)((1/2-\/5/2)=(1/2- \/5/2)/(1/4-5/4) = \/5/2 -1/2 since 1⁄4-5/4=-1 -
r:1 is the same proportion as1:1/r (multiply top and bottom by r)
Note that 1⁄2+\/5/2 = 0.5 + 2.236../2 = .5+1.118... =1.618...
Golden Mean Calipers
Artists and plastic surgeons use calipers to measure golden mean proportions. I ordered my calipers from https://goldenmeancalipers.com/ . It may take a while for it to be mailed; the company is in New Zealand. You may order small (for eyebrows), medium or large. The large one can span up to around 20 inches). The illustration has the medium size caliper.

Links for making your own Golden Mean Calipers: Video: How to Make Your Own Golden Mean Calipers (I have not tried this) :

-
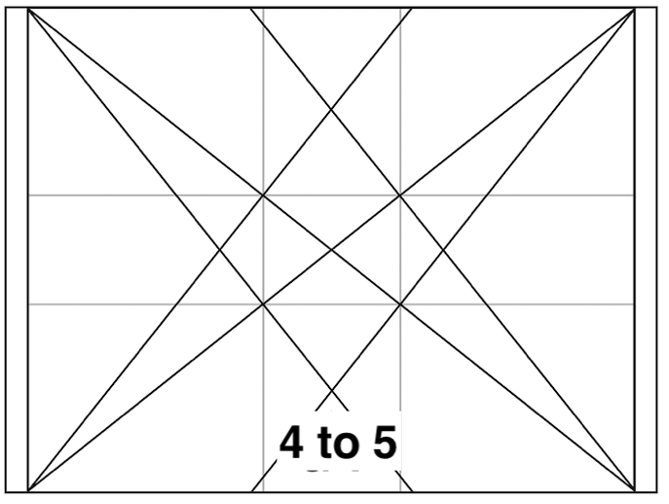
Construct the main diagonals from corner to corner, forming a big X. (2)
-
Pencil in dotted verticals and horizontals through the center point, the
intersection of the two main diagonals. The edges are divided in two by the
vertical and horizontal lines at edge midpoints. Mark off the midpoints.
-
Draw lines from the corners to the opposite midpoints. (8)
-
Draw lines from the midpoints to the midpoints of adjacent edges (forming
Xs in the quarters). (4)
-
Count the number of lines. Do you get 14?
Proponents of the harmonic armature refer to the “musical” divisions created by
the lines; they divide the canvas in thirds, fourths, fifths and sixths.
Some might argue that the Harmonic Armature lacks the underlying structure
that is a critical element of Dynamic Symmetry, but it does have its own
harmony.
Note that for the harmonic armature, ‘stretching’ does not affect the proportion of the distances between the intersection points. The Dynamic Symmetry Armatures are more complex to construct since the reciprocals MUST be perpendicular to the main diagonals; this is a crucial part of the theory behind Dynamic Symmetry.
The Root 2 Rectangle is divided into thirds by the verticals through the intersections of the main diagonals and their reciprocals.

Root 2 Dynamic Symmetry Armature
In a Root 2 rectangle, the reciprocals to the main diagonals are the same as the lines in the Harmonic Armature from the corners to the midpoints of the top and bottom edges. (Recall that the square root of 2 is approximately 1.414.... Hence a 10x14 or 20 x 28 panel is close to a root 2 rectangle. 1: Root 2 seems to be popular proportion historically. Not also that the Root 2 rectangle can be divided into two (vertical) small Root 2 Rectangles.
Andrew Loomis Informal Subdivision
I wanted to apply an Informal Subdivision Armature to a painting that won an
award in 2016. I wrote a blog post on it that might be worth visiting as a review. It
has most of the armatures applied to it. In addition, the post does an extensive
analysis of the Wise Photo App.
Spend some time on this post and let’s discuss whether any of the armatures best
captures the composition of the painting. Note that I very consciously applied the
Golden Spiral to this water artwork while painting it. I tried hard to put the upper
right focal point (waterfall) at the eye of a spiral.
https://karenhalbert.blogspot.com/2022/06/design-armature-examples-applied-to.html

Santa Fe River Turbulence, 10x16, oil.
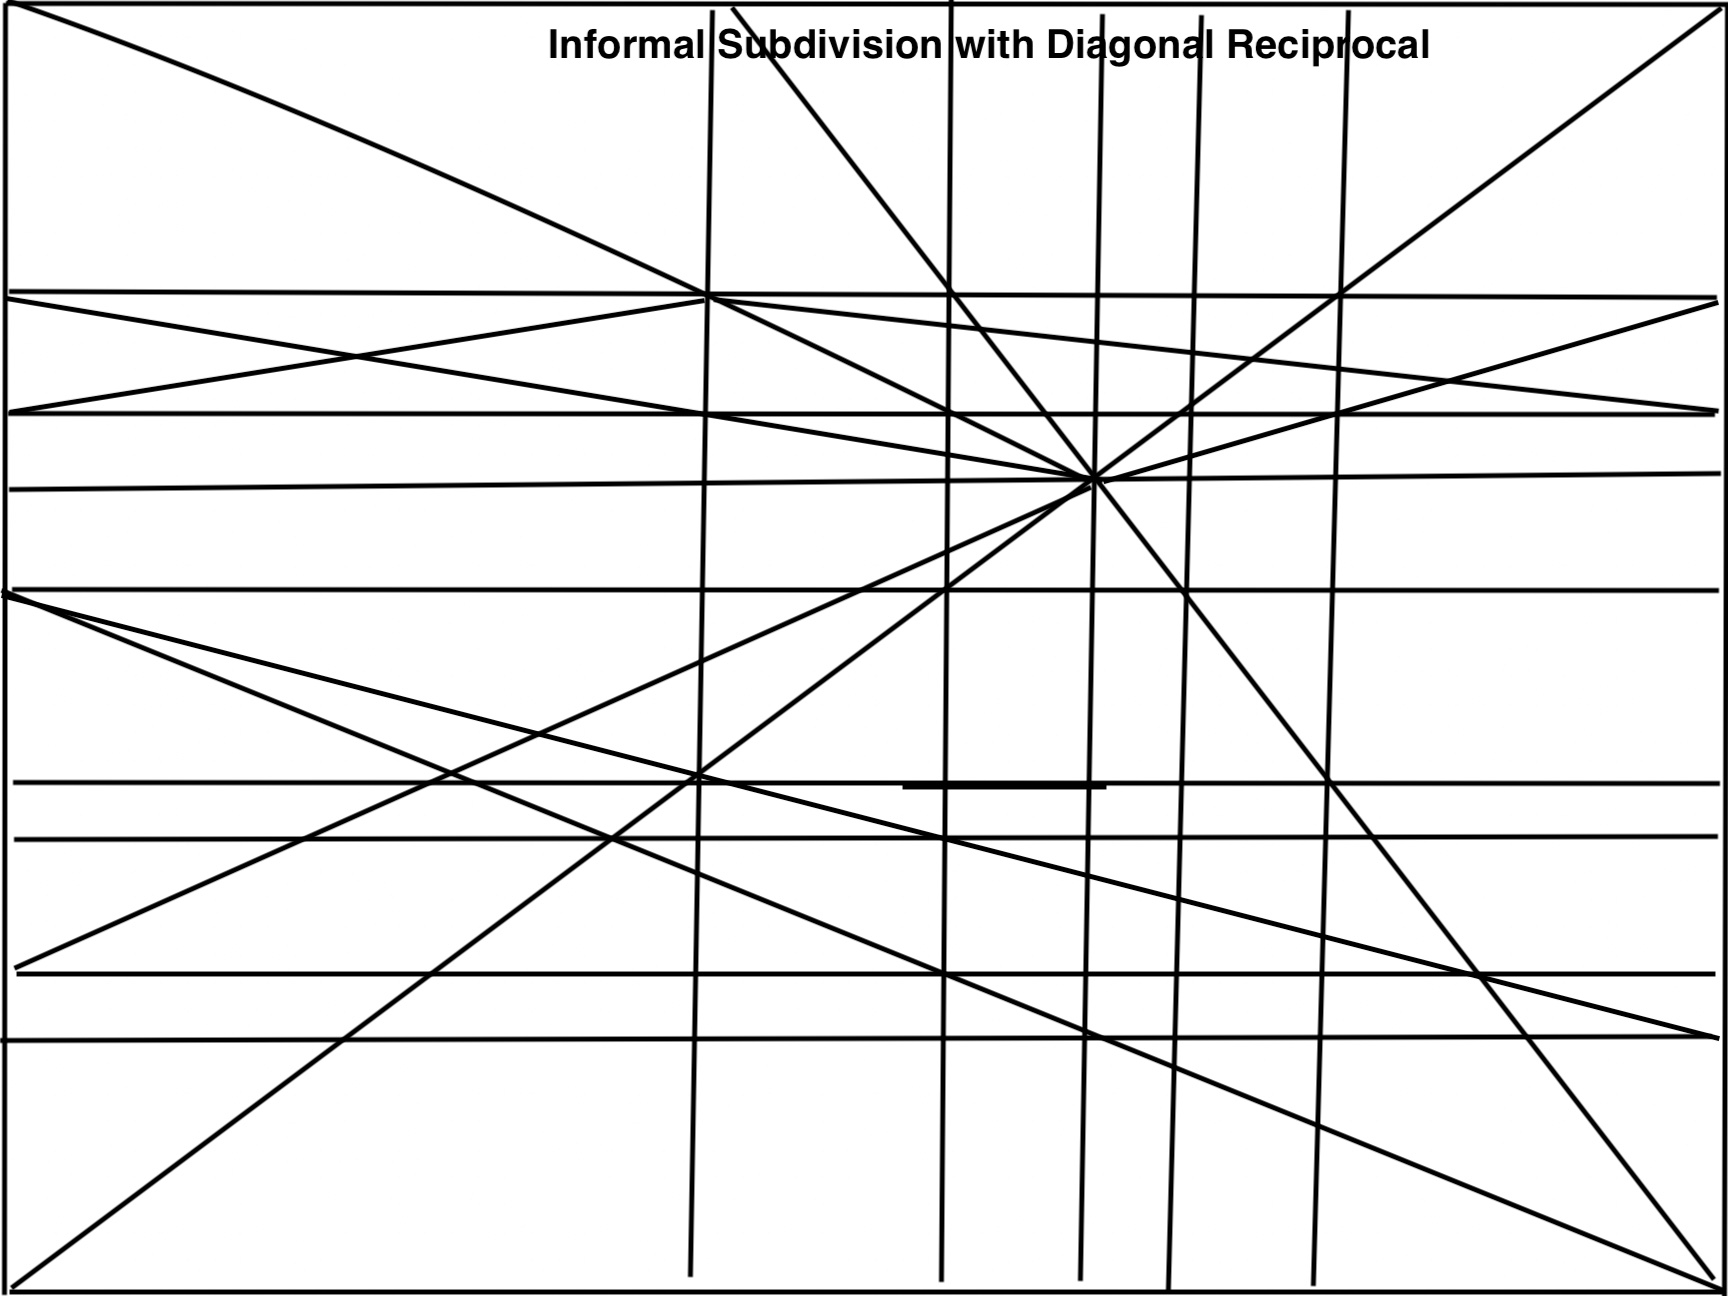
Informal Subdivision Grid
by Karen Halbert
For the informal subdivision in this diagram, I began with 3 lines (Diagonal,
Vertical and Horizontal (through a Golden Point since I knew I wanted this to be
the focal point) but one can begin anywhere, with a main diagonal first. Then I chose an additional intersection point almost arbitrarily for the next triad set of
lines and repeated this process as described in the Loomis book from the 1920s:
Creative Illustration. Constructing these lines is a very creative process - and
enjoyable as well). I tried to color code each triad, but sometimes the lines
overlap. I did consciously try to choose intersection points that would result in
lines leading to the Golden Point.
26
Formal and Informal Subdivision Methods
Andrew Loomis, Creative Illustration
https://karenhalbert.blogspot.com/2022/10/creative-illustration-andrew-loomis.html


A main idea behind the informal subdivision network of lines is that it will not be formal or “mirror-symmetric” (my term). We can see that the previous armatures are symmetric around the central axis. If I didn’t say this before, it should be said or reiterated now; the armatures are a guideline. The artist is free to use lines that help his composition. The usual composition guidelines should still be used; eg, “Ikey, Mikey” rows of objects should be used only very carefully, just as should putting the main subject or focal point exactly at the center of the canvas.
Loomis feels that his informal method leads to designs that are more creative. So, let’s see what he is talking about:
The informal subdivision grid is exactly what it sounds like, a subdivision of space into irregular shapes (with straight edges). The artist designs the grid on the fly. I have a process issue with this method for those times I might want to do a larger studio version of Plein air piece for example. I would prefer to put a grid on the larger canvas proportional to the one used on my plein air work. I would have to set up two canvases as the same time when I want to do a follow-up studio work, following exactly the same steps that I do on the fly. Of course, one can use sight- sizing or a checkerboard grid to try to copy the plein air piece, I think I would prefer using the same methodology for the large painting as the small one and not think of it as simply copying.
However, I think we can indeed create interesting, creative designs using this method.

Step 1. Draw a vertical line, preferably NOT at a division of 1/4/ 1/3, or 1⁄2 of the whole space.
Step 2. Draw a main diagonal (which intersects th vertical at a juncture).
Step 3. Draw a horizontal line through the juncture.
Step 4. Select a rectangle created by this system of the lines. Draw one diagonal through it:
Step 5. Find any other intersection and create a trio of lines as before through that point:
diagonal, horizontal and Vertical.
Continue dividing the space as in steps 1-5.
Suggestions from Loomis (paraphrased):
-
Use only one diagonal in any rectangle. Placing the other diagonal in this rectangle creates spaces that are idenOcal.
-
Any common juncOon of lines produces a potenOal focal point, a point of rest.
-
Any lines poinOng to a vanishing point can contain an addiOonal focal point.
-
Do not place a focal point at the center.
-
Loomis wrote “it is well to avoid using diagonals that bisect the corners as main lines”.
This contradicts my favorite choice of the intersecOon of a diagonal with its reciprocal –
as a point of maximum thrust.
Kevin MacPherson incorporates Andrew Loomis’ Informal Subdivision in his Magic Grid. 30
Informal Subdivision Example
I created an informal subdivision grid to be used, designing the main focal point on the upper right. This can be flipped horizontally or vertically to place the focal point in a different quadrant. I felt it prudent to have a saved grid that I can reuse for larger versions of a study for example (this is a Golden Rectangle, with the focal point at the polar point of the spiral).
I checked the grid by overlaying it with a simplified PHI + Spiral armature (blue and red.):

The polar point is NOT at the expected focal point. I’ll have to try again. I should have used the grid I superimposed on my SF River painting above.
Dynamic Symmetry Tools
Armature Transparency
I use an armature transparency to look at paintings while I create them and after the painting is completed to check conformance with the desired armature. Link to blog post on how to create a transparency:
https://karenhalbert.blogspot.com/2023/07/constructing-transparency-viewfinder.html
![]()
These are generally 5x7 with a mat. The openings may be small enough that you can view any photo or painting with the transparency on top of the phone’s camera viewer
WISE Photo App on iPhone and other smart phones

Select this blog post for a full demonstration of the WISE Photo App: https://karenhalbert.blogspot.com/2023/05/wise-photo-app-revisited.html
Link ON PHONE to order the WISE Photo App (A few dollars): https://apps.apple.com/us/app/wise-photos/id1406085029 - you will have to order this from your smart phone or ipad.
Caveat: For the Dynamic Symmetry composition rule, you can only use photos with camera dimensions: 3 to 4 format for the iPhone and 1.5 Aspect Ratio for photos taken on SLR cameras. For the Fibonacci Spiral rule, you will see the golden rectangle outlined on your photo, which can be used.
Note that as of early 2025, the WISE Camera App has a Harmonic Armature Grid. I feel that it’s a little bright and strong to be useful; it takes over. The WISE Photo App was scheduled to incorporate the Harmonic Armature also.
Guerilla Composition Tool:
This is the tool that allows you to slide the window to the right proportion, the one you are intending to use in the field. Notice how close the dividing lines between the 8x10 and the 11x14 panels are. I like the tool but I have a slight issue with it: the ratios on the left should be in ascending order, even if close. The 14x18 should be listed after the 11x14 panel since the aspect ratios are 1.29.. and 1.272727... respectively. In actuality, the difference is so slight that we can use them interchangeably at least at this size. Even slightly larger panels at the same proportion might seem very close in size: a 22x28 (2 times 11x14) compared with 21 by 27 (1.5 times 14x18). Perhaps this is why the Guerilla tool seems to lump together both panel sizes.
 .
. 
Root Rectangles Introduction
Examples of armatures for the popular panel sizes and the Root dynamic symmetry sizes (root 1, root 3, golden spiral, etc.) may be seen on this post:
https://karenhalbert.blogspot.com/2023/06/basic-dynamic-symmetry-armatures.html
Root Rectangles are rectangles with an Aspect Ratio the (Square) Root of an integer; eg, Root 2, Root 3, ... For example. the square root of 2 is that number, which when multiplied by itself equals 2; Root2 * Root2 = 2. Root2 is approximately 1.414... while Root 3 is approximately 1.732. A rectangle with height of 1 and width the square root of 2 is a Root 2 rectangle. Since root 2 is approximately 1.414, then a 10x14 canvas is close to a Root 2 Rectangle.
Construction Exterior to a Square

The only Root-rectangles with a popular panel size are Root 1 (square) and Root 4; or Root 4 to 1 or 2 to 1, with examples 10x20, 8x16, 12x24, etc.. Root-9 would be 3:1 – perhaps not popular but an additional example.
35
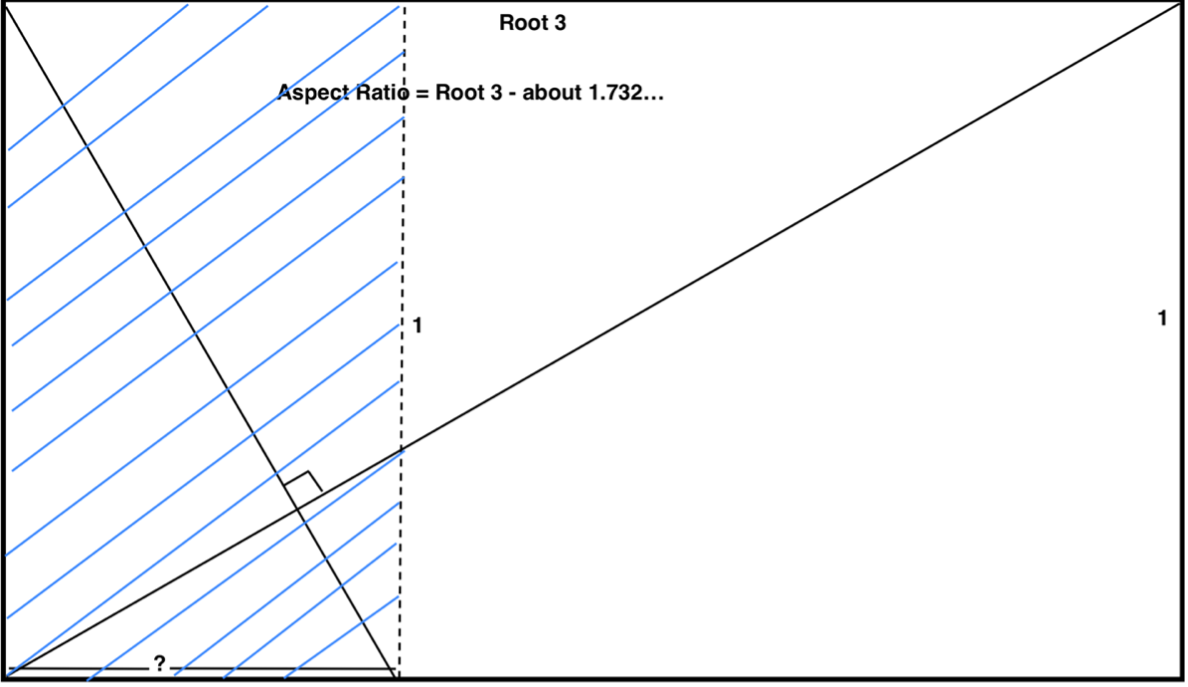
The striped region has the same proportion as the main rectangle (in reverse) so its
aspect ratio is 1/Root 3.
Multiply top and bottom by Root 3 to get (Root 3)/(Root3*Root3) = Root3/3 or 1/3
of Root 3.
Hence the main Root 3 rectangle can be subdivided into three vertical root 3
rectangles.
A similar argument holds for other Root Rectangles since (Root n * Root n) = n
and a Root n rectangle can be subdivided into n Root n vertical rectangles.
This makes the Root rectangle harmonious; the Greeks believed that repetition is harmonious. Repeating shapes at different proportions leads to what they termed symmetry or self-similar shapes. (This might lead to a discussion of Fractals or Mandelbrot series).

A 1922 illustration of the property that a root-N rectangle divides into N reciprocal rectangles of the same proportions.
What about Golden Rectangles? How do they fit into this theory? It turns out that by definition, a golden rectangle ends up being (infinitely) divisible in such a way that each division is itself a golden rectangle, again illustrating the magical ‘self- similarity’ so prized by the Classical Greeks and by Renaissance artists.
In addition, the derivation of the golden mean illustrates a strong connection between the golden mean, PHI, and Root 5:
𝑃𝐻𝐼 = (1+\/5)/2 as seen in the Construction of the Golden Rectangle above.
And in fact, the Dynamic Symmetry Armature of the Root 5 Rectangle can be divided into two overlapping PHI rectangles where they overlap by a square.

My plan is to create paintings at Root 2:1, Root 3:1 and Root 5:1 proportions or approximations such as 10x14, 10x17 or 10x22.


Other Root horizontals: continue looking at the intersections of the quarter circle with the dotted lines (hypotenuses) for the additional Root horizontal lines.
The general formula for the proportion of Root Rectangles constructed in this way is:.
The proportion of the Root N rectangle is 1 to 1/Root N.
Construction of Quarter Circle Square Armature with overlapped Root 2 Dynamic Rectangles

-
Main Diagonals (dotted here).
-
Center Vertical and Center Horizontal
-
Quarter Circles (arcs) from each corner
-
Inner Square passing through intersections of arcs (and center verticals and horizontals)
-
Orange horizontal and Turquoise horizontal through intersections of the arcs and the
main diagonals. These create overlapping Root 2 rectangles within the square.
Miscellaneous Grids for Printing
Roughly in order of Aspect Ratio from Square (1:1) up to Root 4 (1:2) to Root 5 (1:2.34). Most are provided within a 3x4 rectangle (for easier comparison).
Square. Ratio 1


Ratio 1.2xx


3 to 4 Ratio 1.333


Root 2. Ratio 1.414

2 to 3 Panel. Ratio 1.5


ROOT 3: Ratio 1.732

ROOT 4. Ratio 2.0. 1 to 2 Proportion (eg; 8x16 or 10x20):


Root 5. Ratio 2.234


Select Bibliography
Links to be added
For a more comprehensive list, visit:
https://karenhalbert.blogspot.com/2023/05/reference-bibliography.html
Books:
Amazon links (underlined blue). Most have Kindle options. Also google them for possibly free pdf downloads.
Geometry of Design by Kimberly Elam. Beautiful little book. The transparent over leaves are a real plus. A good one to read if this is the only one you read. It does promote the golden mean as a design principle.
Painters-Secret-Geometry-Study-Composition by Charles Bouleau. A study of composition in art.
The Elements of Dynamic Symmetry by Jay Hambidge. Also read Dynamic Symmetry a Criticism by Edwin M. Blake.
The Geometry of Art and Life by Matila Ghyka
The Art of Composition. A simple Application of Dynamic Symmetry by Michel Jacobs
Mathematical Thought from Ancient to Modern Times by Morris Kline, 1972.
Creative Illustration by Andrew Loomis. Informal Subdivision, pg 36-39. Classical-Painting-Atelier-Contemporary-Traditional by Juliette Aristides. Harmonic
Armature.
Dunstan, Bernard, Composing your Paintings.
The Anatomy of Trees for Artists by V.A. Cole On Growth and Form by Thompson
Golden Mean:
https://www.goldennumber.net/art-composition-design/. Meisner. Major website on the golden number. Examples of artwork designed with the golden rectangle.
https://en.wikipedia.org/wiki/Golden_rectangle (construction; brief history)
The Golden Ratio: The Story of PHI, the World's Most Astonishing Number. Mario Livio.
Critical of the attention paid to the golden ratio.
https://www.goldennumber.net/golden-ratio-misconceptions-by-george-markowsky- reviewed/ Meisner - debunking the debunkers.
2020: https://quantumgravityresearch.org/lay-person-overview/ (scroll down for the video): referenced by Meisner:
https://anthonywaichulis.com/fools-gold-a-primer-on-pictorial-composition-part-v/: worth reading.
General:
"What if the belief that the golden ratio is a foundational building block of the universe turned out to be true? Long thought to be the fodder of mystics and cranks, it now appears that once was thought to be myth may in fact be at the center of the math that defines reality as we know it.
Intuitive Composition by Albert Handell
Composition by Arthur Wesley Dow
Composition of Outdoor Painting by Edgar Alwyn Payne
The Timeless Way of Building, Christopher Alexander
Websites:
Judith Reeve: https://www.attentiveequations.com/ Art historian and professor AND painter with much information on the development of design. She has done thorough research on rebating the square with examples applied to classical art paintings. She also has a wealth of information on early 20th century artists, including Robert Henri, a follower for a while of Hambidge’s Dynamic Symmetry.
50
Websites with extensive material on Armatures:
http://www.the-art-of-composition.com/ Harmonic Armature
https://ipoxstudios.com/#home Dynamic Symmetry and Root Grids (Tavis Leaf Glover)
Tavis has MANY grids with various combinations and many free articles to read. He also
has a book with extensive examples.
One such set of grids is the following for 4 to 3 or 1.333 canvases (or near 1.333)