2023 Preliminary Workshop Notes on Composition Armatures
11/17/2024: I had forgotten how much I wrote on this post. Much of this material was used for the 2023 workshop I taught at the Bluebird Studios in Santa Fe. After writing this blog post I decided to use word documents to maintain the notes. The 2024 workshop was given as a continuation but due to the review of the concepts in the workshop new students attended as well. For more information, visit the Workshops' tab on my website: https://karenhalbert.com/. Plans are being made now for a 2025 workshop.
10/4/2023: Extensively revised in a separate word document, simplified with the addition of images. A 'flip book' has been created that should be kept up-to-date:
10/2/2023 Initial outline for a workshop that covers several armatures or grids that can be used by painters during the composition phase or the post-analysis phase.
Composition Armatures
4:3 Dynamic Symmetry Armature 4:3 Harmonic Armature
1-Day Workshop Description
1-day Workshop Composition Armatures by Karen Halbert
website: www.karenhalbert.com
Tentative: a Saturday in November 2023
Several armature or grid systems have been designed since the Classical Greek Era to the current times, to be used by painters during the design phase. They may be utilized to plan the spacing for a painting within a canvas. In addition, paintings may be analyzed against the grids in a critique. I have also enjoyed studying various paintings to see if in fact a particular armature was used or could have been used. Some artists explicitly stated that they began with a specific grid system while others kept the hidden mathematics or geometry a secret. A fascinating tome by Charles Boulleau documented how he spent a year searching for the hidden geometry in paintings. The title is "The Secret Geometry of Painting" with many examples.
The systems to be referenced in this workshop include the Rule of Thirds, Harmonic Armature, Dynamic Symmetry -Basic and Expanded- and Informal Subdivision. Construction of these armature systems will be used to help develop harmonious compositions. The use of a golden mean caliper will be illustrated also - as a means to create unequal measures and a division of space that is said to be natural or more pleasing to the senses.
In this workshop we will apply Armature Systems to some well-known landscapes. And decide for ourselves whether an armature was used. In addition, though, we will look at the the workshop participants' landscapes -or other paintings- to determine how the use of an armature might have improved the paintings - or not. Participants will construct their own armatures in the workshop.
Demonstrations will include a look at tools such as Photo Shop, the iPhone and iPad apps, Wise Photo Apps and Snapseed.
Karen Halbert, former college professor of Mathematics and current Landscape Painter, will present the armature systems from an artist's point of view, using examples from art history. Her background in Mathematics gives her a unique perspective though, shall we say following in the footsteps of artist-mathematicians such as Piero della Francesco and Leonardo da Vinci. In this workshop you will get a glimpse of how a Mathematician perceives the underlying framework of paintings. However, as an experienced professor of introductory college mathematics, Halbert is able to explain the underlying Mathematics in simple, straightforward terms if necessary or desired. But the main goal of the workshop is for the participants to construct armatures and apply them to their own paintings.
This short introductory video on geometry in art, Nature by Numbers that might be worth watching in advance of the workshop: https://www.youtube.com/watch?v=kkGeOWYOFoA
Before beginning, we will have a brief slide-show on participant painting examples with grids overlayed on the paintings -to be kept in mind as we analyze armatures with historic examples throughout the morning.
Workshop Outline
Morning (2 hours): Basic Concepts and Building Blocks
- Introduction to the armature systems and their history including rationale for their use.
- Building Blocks and terms for the armature systems: Rectangle and Proportion, Aspect Ratio, Diagonal, Reciprocal, Golden Points, Self-similar shapes ad Gnomon's, Rabatement, Root Rectangles, Golden Mean Rectangle. And focus points or polar points, gamut and coincidences.
- Harmonic and Dynamic Symmetry Armature construction methods with paper, panels and pencil using either T-squares, rulers or other panels as straight-edges.
- Transparencies
- Differences among the systems illustrated for one or two examples.
- Armatures for popular panel sizes such as 8x10, 8x12 and 11x14 with more emphasis during the class on the 9x12 panel.
- Demonstration of how to use the iPhone tools in the field for plein air work.
- Works with armatures by Historic and Contemporary Masters such as Goya, Seurat, Parrish, Da Vinci and Bellows as well as contemporary artists, Kegler, Byrne and Hudson.
- Root Rectangles and why they are powerful. These will not be analyzed in detail but references will be provided. Comparison of Root Rectangles with popular panel sizes.
- Golden Mean Rectangle and the Fibonacci Series
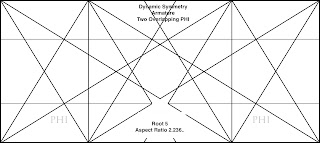
- (Optional) A brief look at more advanced, combined armatures including Root 5 with its Overlapping Golden Rectangles.
- Example of my own paintings overlaid with Dynamic Symmetry Grids (with Harmonic Armature grids to be added). See https://www.karenhalbert.com/myexhibits.cfm?exhibit_id=114 or https://www.karenhalbert.com/myexhibits.cfm?exhibit_id=113. The flip book vrsions can be perused also; they are listed on thes 'exhibit' pages.
Participants will work at their tables to prepare panels with armatures and transparencies for further use.
- A few participant examples provided in advance will be analyzed for everyone to see and evaluate. Grids will be superimposed on the paintings on the computer with an enlarged TV monitor for viewing.
- Participants will construct armatures in tandem with the instructor initially step-by-step.
- Participants will analyze their own paintings at the table using transparent grids (provided) and construct armatures with help from the instructor.
- Participants with an iPhone or iPad Wise Photo Tool will experiment with the tool with the help of the instructor at the table (others may watch).
Preliminary Preparation:
The workshop participant will provide:
- (submit in advance: )1) image of own painting illustrating a strong underlying composition and structure and 2) image of own painting in need for composition improvement (preferably a 9x12 or other 4:3 aspect ratio painting such as a 6x8).
- printouts of photo references for their paintings, either the paintings in the first bullet, or other paintings for analysis
- printouts of paintings or the paintings themselves or both. For now the preference is a 6x8, 9x12 or 12x16 painting
The workshop participants will be provided with:
- a 6x8 and 9x12 panel, to work on constructing their first armature
- transparency pre-filled with a 3:4 dynamic symmetry grid to overlay on their own painting images for evaluation
- diagonal gauge transparency
Introduction:
To begin with, why use an armature when designing a composition? We understand that most professionals begin with a design, whether it's an architectural blue-print, a house plan, a sketch of an automobile, with measurements, a layout of furniture in a room to scale, a plan for a garden. We can think of numerous instances where a formal design is used. Carpenters need measurement tools when building a house. What does a house scaffolding look like? It's a mesh of triangles, squares or diamonds, a network that we hope is as strong or sturdy as needed while building a house, for example. Could the painter benefit from such a scaffolding? Or is a scaffolding too restrictive? Can a firm foundation be used creatively? I have heard excellent, creative artists say that they now rely upon a dynamic symmetry framework or harmonic armature, at least mentally in their head.
Perhaps the experienced artist uses an armature intuitively? Or isn't it enough that we've all learned the rule of thirds (ROT), which itself is an armature. How is dynamic symmetry different? The ROT guides the artist toward not making a completely symmetric (perhaps boring) composition. It helps prevent dividing the canvas in half, for example. The DS Armature does more than this, though, one could argue. It provides directional lines and several points of interest distributed across the canvas that might trigger the artist's awareness of potential places to paint elements to be noticed. The armature might help the artist to figure out how to direct the viewer's eye around the canvas, a goal in our paintings.
But you say, I do this already; I can visualize how to place important elements around the canvas to guide the viewers' eye. And indeed, the experienced artist already does this. Can the experienced artist benefit from these particular armatures/grids? We all want to continue learning and improving our paintings. So let's see the advantages of this particular mazes of lines known as the Dynamic Symmetry and Harmonic Armature, if any. Why are they dynamic or harmonic? We will try to answer this. In addition, this workshop is a way for the artist to analyze his paintings via the armatures. Hands-on tools will be made available.
First, we describe how to construct a Dynamic Symmetry Armature on your panel.
The 4:3 Dynamic Symmetry Armature can be used for any paintings proportional to a 3x4 panel; eg, 6x8, 9x12, 12x16, 18x24, popular panel sizes. The horizontally oriented panels work well with landscapes. In the field, we might find the 9x12 a good size for a 2-3 hour painting. A 6-8 could be used for a sketch (or finished painting) and then used as a reference for a larger painting with the same proportion. Since so many panels are readily available with this proportion, it's a good size. We note that the popular 11x14 doesn't have larger versions readily available (22x28 for example). A smaller panel with the same proportion would be a 5.5 x 7. However, I like the 11x14; it's also a size that can be painted in the field within a relatively short period of time. I find the 12x16 a little too large for a 2-3 hour painting and I consider myself a fast painter. But I have used this larger panel in the field, especially in familiar places.
In any case, how was this armature constructed? Following are images of the step by step process. Before continuing though, I would like to say something about the tools. One can use a T-square to make sure that vertical and horizontal lines are drawn or that lines perpendicular to a diagonal could be constructed. I use a small plastic one in the field for my 9x12's. But one can easily use a second panel to hold against the first panel to draw the armature lines. By the way, no 'ruler' measurements are required for the construction (though they might prove efficient).
4:3 Dynamic Symmetry Armature Construction
For 9x12, 1x16, 18x24, .. panels. The proportion of this example is 3:4 (or 4:3) but the construction steps remain the same for other proportions. The end result is noticeably different, however, since to begin with the diagonals cross each other at different angles if the proportions are different.
Step I. Main Diagonals.
Draw diagonal lines from corner to corner.
Step 2. Main Diagonals plus Reciprocals.
Step 3: (Final) Basic Dynamic Symmetry Armature
We consider this our basic Dynamic Symmetry Armature. It has the main diagonals and their reciprocals plus 4 main verticals and horizontals through the intersections of the diagonals and their reciprocals. Let's call these intersection points the "eyes" of the armature.
This seems to be a fairly sturdy scaffolding. The eyes are at points of maximum thrust shall we say since the angle between the two intersecting lines is maximized at 90 degrees. The eyes also have several lines radiating from them, potential directional lines to draw the viewers' eye around the canvas.
But is there anything else about the structure that is not only strong but pleasing? I propose that the fact that the 'grid' has additional rectangles with the same proportion as the whole to be important - the rectangles in the corners - and the middle. Their diagonals line up with the main diagonals. They are self-similar, with the same shape or proportion as the main rectangle. This idea calls to mind, fractals. Fractals are based on self-similar shapes; in a fractal, one can keep sub-dividing a shape to make smaller and smaller, similar shapes with the same proportions.
Step 4a. Self-similar Rectangles.
If we drop verticals from the top edge at the point where the reciprocals meet the top edge it can be shown that the vertical rectangle constructed here is the same proportion as the main rectangle. The fact that the reciprocal is perpendicular to the main diagonal is critical.
The turquoise lines delineate the vertical rectangles with same proportions (with the dotted lines the diagonals of these rectangles). To visualize this, rotate them 90 degrees so that the diagaonals align themselves with the main diagonals of the larger rectangle/panel.
Illustrated example of a distorted 5:4 Dynamic Symmetry Armature.
In the distorted version the diagonals are not at a 90 degree angle with their reciprocals.
Master Paintings
Now let's apply the Dynamic Symmetry Grid to a few Master Paintings.The literature is filled with examples. Try googling master paintings and dynamic symmetry. Historically, it is said that some master painters kept the use of armatures as a secret. So one might not find drawings with grids.
One of the criticisms of these grids is that the more complex grids can be superimposed so that lines following the grid can always be found.
But I feel that having a structure does free the artist to concentrate on 'hard' things.
The link provides many details about constructing root rectangles and does an analysis of potential composition techniques that would have been applied by Parrish, given that Parrish stated that he used the Dynamic Symmetry Geometry. Was Maxfield creative within his very technical restrictions on composition (and color, by the way; that's a topic for another time)?
Analysis 1: Maxfield Parrish Daybreak
I remember seeing an analysis of this painting years ago. I googled it and found Scott McDaniel's article: http://www.scottmcd.net/artanalysis/?p=53: "Daybreak was the 20th century’s single most popular print in America. According to Alma Gilbert, the House of Art ,which handled the printing, estimated that 1 out of every 4 homes in America had a copy. When I first started reading up on this painting I constantly ran across the term 'Dynamic Symmetry.'."
More: "That is what Dynamic Symmetry is all about – subdividing the square or rectangle into smaller, pleasing shapes."
More: "That is what Dynamic Symmetry is all about – subdividing the square or rectangle into smaller, pleasing shapes."
The link provides many details about constructing root rectangles and does an analysis of potential composition techniques that would have been applied by Parrish, given that Parrish stated that he used the Dynamic Symmetry Geometry. Was Maxfield creative within his very technical restrictions on composition (and color, by the way; that's a topic for another time)?
Another bit of information from https://www.christies.com/en/lot/lot-4715251 :
Parrish began experimenting with landscapes in the 1890s, painting and sketching around Cape Ann, Massachusetts, and introducing landscape elements into his magazine and book illustrations. The turn of the century brought two consecutive commissions from Century Magazine that had a profound effect on his landscape painting. During the winters of 1901-02 and 1902-03, Parrish traveled in and around Arizona to produce a series of paintings for Ray Stannard Baker's article "The Great Southwest." Parrish was immediately fascinated by the area's dramatic lighting and brilliant range of color, both of which created impressive effects against the unusual terrain. As Coy Ludwig points out, "the dramatic effects of the southwestern sunrises and sunsets, with their reflections of brilliant orange hues and shadows of purple and blue, and the craggy terrain of the canyons became forever a part of Parrish's artistic vocabulary." (Maxfield Parrish, New York, 1973, p. 171) These majestic mountains were the origin of the idealized terrains that became signature of his later works including Daybreak.
Also from Christies (again):
Parrish used "Dynamic Symmetry", the principals of Jay Hambidge, a Yale University Professor, to lay out the composition. This theory was based on a rediscovery of ancient Roman and Greek formulas to create harmonic proportions in architecture and art. "I lay each painting out on the basis of 'dynamic symmetry' or the mathematical proportion which the ancient Greeks and Egyptians found appealing to the eye. Thus by using 'dynamic rectangles' and 'whirling squares'...I design the dimensions of my pictures and block them off, placing the horizon in just the right place." (as quoted in Maxfield Parrish: A Retrospective, p. 2) The preparatory sketch for Daybreak has the carefully measured penciled lines of "dynamic symmetry" (fig. 4*). The appeal of this ordered method for Parrish lies in his architectural background. The harmony that it creates in a composition is one of the reasons that so many people find Parrish's works aesthetically appealing.
Maxfield Parrish, Daybreak, 26.5x45", oil
*Copy of a figure with pencil lines by Parrish, from my copy of Coy Ludwig's book: Maxfield Parrish:
Parrish seems to have used a variation of Dynamic Symmetry. Does this armature follow these pencil marks (tbd)?
The distant hill line parallels a main diagonal as do the nearby rocks. The main verticals line up perfectly with the inside of the pillars. The head of the girl lying down is near the lower left intersection of a diagonal with its reciprocal.
One resource indicated that Parrish used a Harmonic Armature:
In fact some of the diagonals align quite nicely. The posts are not along the 'thirds', but if we were to draw the verticals through intersection points, it does seem as of the verticals at the fourth marks line up with the insides of the posts.
As an aside Gurney wrote an illuminating blog post (in 2009!) on the color shift of Parrish's Daybreak:
http://gurneyjourney.blogspot.com/2009/12/daybreak-blues.html. Be sure to read the comments, including an informative one by Thomas Kitts.
And one other comment by a viewer of the original painting: "As to color, it was glorious beyond belief and seemed backlit like a giant transparency. It was jaw-dropping. I remember it being rich with pink and lavender shades, not even remotely like the yellow/blue prints I had seen up to then."
Wikipedia: "Like many artists Parrish also makes use of the Golden Ratio; a technique using math that helps frame the pillars and greenery to add the most focus on the two figures in this painting. While Parrish's techniques may have been tedious, almost every single fantasy illustrator you can name borrows from the technique and style of Maxfield Parrish, ensuring that his visions live on."
Michaelangelo:
Analysis of Seurat's Bathers at Asnieres;
This painting has been analyzed in great detail in a delightful design book: Geometry of Design by Kimberly Elam (highly recommended).
This 201 x 301 cm panel is 3:2 rectangle with aspect ratio 1.5 ). A smaller panel with this proportion would be a 20" by 30" or 10x15. this happens to be almost precisely a popular professional camera proportion. Elam chose to use a golden rectangle to analyze this painting. I have taken a screen shot and superimposed a 1.5 grid and a golden rectangle grid for comparison and analysis:
PHI Dynamic Symmetry Armature (cropped on top and bottom)
I think both grids are similar enough (since I centered the golden grid) that it doesn't matter which is used for the analysis. I have a question about both though: Elam states that the horizon line is at the top horizontal (that actually is above the hat of the central boy figure). Do you agree? Seurat was supposed to be very careful about the perspective. We might want to try something here.
Wise Photo App
Perhaps it's time to consider using the phone's app: Wise Photos. I have covered the use of this app extensively in the post, especially applied to this painting:
I've experimented with the app at length and have some issues with the proportions, but it's great fun. Here's a link to order it: https://apps.apple.com/us/app/wise-photos/id1406085029 (the first two rules are free from apple; it costs a few dollars otherwise) for the iphone and ipad.
And here are some screen shots available at that link.
Caveat:The app crops the photo to fit the rule. So be careful. Don't try to line up the two different types of grids for the same photo.
Recommendations if you are paying attention to proportions (I have wasted a lot of time figuring this out). Other proportion paintings will be cropped.
1. Use only a 4:3 proportion (iPhone, etc.) for the Dynamic Symmetry 'Rule'. Others might be cropped. Or just be aware that your image might be cropped. This is a popular phone size.
You can see that this is cropped from the original (above); the right boy's elbow touches the edge; the left boy's back touches the edge.
2. Use only near-golden proportions (10x16) for the PHI grids; it you use another proportion, you will see cropping:
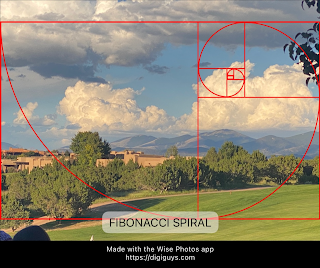
Here's a normal 4:3 photo with a WISE app Fibonacci Spiral:
If I wanted to paint this scene on a 10x16 then I would (mentally) crop it to the red border rectangle (and consider making the cloud at the upper right "eye" the main focus.And others:
A Picasso with his grid:
Additional References:
Guerilla Composition Tool:
Notice how close the dividing lines between the 8x10 and the 11x14 panels are.
Pythagorean Theorem
The sum of the squares of the legs = square of the hypotenuse in a right triangle:
Example applied to the 3-4-5 Right Triangle:
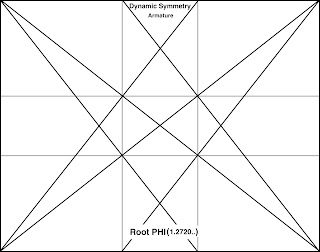
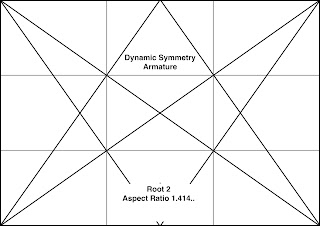
Basic Dynamic Symmetry Armatures:
Note here that the harmonic Armature is easier to use since it can be stretched to fit any size. These Dynamic Symmetry Armatures illustrate that they are more complex to construct; the reciprocals MUST be perpendicular to the main diagonals. This is how the 'baby proportional vertical rectangles are constructed.
I've listed here for comparison the popular panel sizes and the Root panel sizes:
Dynamic Symmetry plus Harmonic Armature Illustration:
The Root Rectangles illustrate a more direct comparison of the two armatures .
For the Root 3 (square root of 3, approximately 1.732) the verticals formed from the top edges of the perpendicular reciprocals fall at the thirds. Note that 1/Root 3 is the same as Root 3/ (Root 3 x Root 3)
= 1/3 (Root 3) since Root 3 x Root 3 = 3 by definition.
The other root rectangles would have similar properties, making them good candidates for canvases that are more harmonious. For example a Root 2 rectangle would be divided into two rectangles also of proportion root 2. Note in passing that the root 2 rectangles are the basis of European size papers; they consist of non-overlapping root 2 rectangles, saving space.
The canvas size that is arguably the most pleasing, the one that has subdivisions that align themselves in ways that are more harmonious, with more lines lining up illustrates the golden spiral superimposed on the dynamic symmetry grid. .
PHI Dynamic Symmetry plus Golden Spiral
A question to be asked: how does this relate to the Harmonic Armature? Does it? The construction of the Harmonic Armature depends on dividing two edges in two. This seems to be incommensurate with the irrational ratio of PHI (approximately 1.618....). But the irrational root 3 fits nicely with the Harmoinc Armature though it is also an irrational number. To be explored furter. This diagram might not be exact.


